Ultimate Brookie Bars-Cookie Brownie Perfection
Brookie perfection is about to become your new obsession. Imagine a dessert that perfectly marries two of the most beloved treats on the planet: the chewy, sweet chocolate chip cookie and the rich, fudgy brownie. That’s the magic of the brookie! It’s not just a dessert; it’s an experience, a delightful duality that satisfies every sweet craving. Why do we all adore this phenomenal creation? Because it’s the ultimate compromise, the dessert that finally brings peace to the great cookie versus brownie debate. With a brookie, you get the best of both worlds in every single bite. What makes this particular brookie recipe so special? It’s the careful balance of textures and flavors, ensuring that neither the cookie nor the brownie element overpowers the other, but instead, they dance together in harmonious decadence. Get ready to create a masterpiece that will have everyone asking for seconds.
The Ultimate Brookie Bar Recipe: A Symphony of Cookie and Brownie Perfection
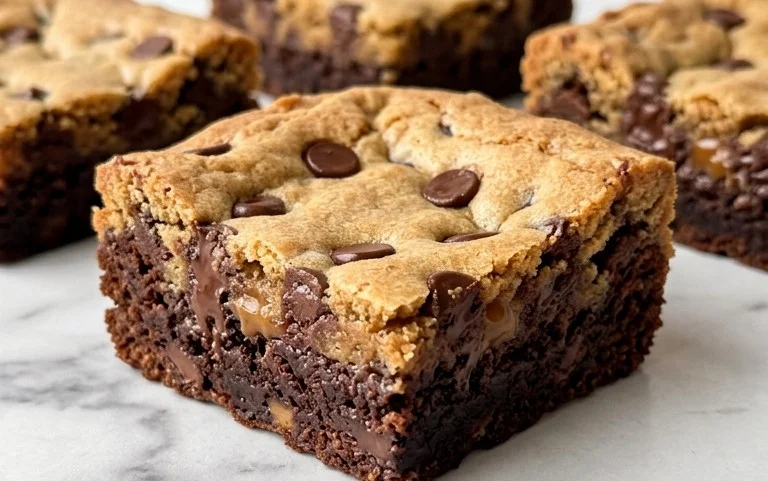
Get ready to experience dessert nirvana with these incredible Brookie Bars! This recipe masterfully combines the chewy, buttery goodness of a classic chocolate chip cookie with the rich, fudgy decadence of a chocolate brownie. It’s a two-in-one treat that’s guaranteed to impress, whether you’re baking for a special occasion or just indulging your sweet tooth. The beauty of this recipe lies in its simplicity; we’ll be layering these beloved treats right on top of each other, creating a stunning and delicious marbled effect. No complicated techniques, just pure, unadulterated deliciousness. Prepare your taste buds for a journey of textural and flavor contrasts that will have you reaching for a second, and maybe even a third, bar!
Ingredients:
- 3/4 cup Butter ((softened))
- 1 cup Sugar
- 1/3 cup Brown Sugar
- 2 large Eggs
- 1 teaspoon Vanilla
- 1/2 cup Unsweetened Cocoa Powder
- 1 cup Flour
- 1/2 teaspoon Baking Soda
- 1/4 teaspoon Salt
- 1/2 cup Chocolate Chips ((optional))
- 1/2 cup Butter ((softened))
- 3/4 cup Brown Sugar
- 1/4 cup Sugar
- 1 large Egg
- 1 teaspoon Vanilla
Crafting Your Brookie Masterpiece
This recipe is broken down into two main components: the brownie layer and the chocolate chip cookie layer. We’ll prepare them separately and then unite them for an unforgettable baking experience.
Part 1: The Fudgy Brownie Base
1. Preheat and Prepare: First things first, let’s get our oven ready. Preheat your oven to 350°F (175°C). This is a crucial step to ensure even baking throughout. Now, prepare your baking pan. I recommend using an 8×8 inch baking pan. Line it with parchment paper, leaving an overhang on the sides. This makes lifting the finished brookie bars out of the pan incredibly easy and helps with cleanup. Trust me, you’ll thank yourself later!
2. Melt and Mix: In a medium bowl, melt the 1/2 cup of butter. You can do this in the microwave in short bursts, stirring in between, or over a double boiler. Once melted, whisk in the 3/4 cup of brown sugar and the 1/4 cup of granulated sugar until well combined and smooth. This sugar mixture will form the sweet foundation of your brownie layer.
3. Incorporate Wet Ingredients: Add the 1 large egg and 1 teaspoon of vanilla extract to the sugar and butter mixture. Whisk vigorously until everything is thoroughly incorporated and the mixture is glossy. Don’t overmix at this stage; we just want it to be well combined.
4. Dry Ingredients Unite: In a separate small bowl, whisk together the 1/2 cup of unsweetened cocoa powder, 1 cup of flour, 1/2 teaspoon of baking soda, and 1/4 teaspoon of salt. Sifting these dry ingredients together will help prevent any lumps and ensure they are evenly distributed in the batter.
5. Combine and Pour: Gradually add the dry ingredients to the wet ingredients, mixing until just combined. Be careful not to overmix the brownie batter, as this can lead to tough brownies. You want to mix until there are no dry streaks of flour visible. The batter will be thick and fudgy – exactly what we’re aiming for! Pour this glorious brownie batter into your prepared baking pan and spread it evenly to cover the bottom.
Part 2: The Chewy Chocolate Chip Cookie Topping
1. Creaming the Butter and Sugars: Now, let’s move on to our cookie layer. In a large bowl, cream together the 3/4 cup of softened butter, 1 cup of granulated sugar, and 1/3 cup of brown sugar. You can use an electric mixer for this or a sturdy whisk and some elbow grease. Creaming means beating these ingredients together until they are light and fluffy. This process incorporates air, which is essential for a chewy cookie texture. Scrape down the sides of the bowl as needed to ensure everything is evenly mixed.
2. Adding Eggs and Vanilla: Beat in the 2 large eggs, one at a time, mixing well after each addition. Then, stir in the 1 teaspoon of vanilla extract. Again, make sure everything is well combined.
3. The Dry Components: In a separate medium bowl, whisk together the 1/2 cup of unsweetened cocoa powder (yes, more delicious cocoa!), 1 cup of flour, 1/2 teaspoon of baking soda, and 1/4 teaspoon of salt. Just like with the brownie batter, whisking these dry ingredients together will ensure they are evenly distributed throughout the cookie dough.
4. Bringing it All Together: Gradually add the dry ingredients to the wet ingredients in the large bowl. Mix on low speed or with a spatula until just combined. Be careful not to overmix. You’ll want to stop mixing as soon as you no longer see any dry streaks of flour. This is also the point where you can stir in the optional 1/2 cup of chocolate chips if you’re using them. These will add extra pockets of melted chocolate throughout your cookie layer.
5. Creating the Marbled Magic: Now for the fun part! Dollop spoonfuls of the chocolate chip cookie dough over the brownie batter in the pan. You don’t need to be neat or precise here. The goal is to create a scattered, imperfect topping. Then, using a toothpick or a butter knife, gently swirl the cookie dough into the brownie batter. Don’t over-swirl; you want distinct ribbons of cookie and brownie, not a uniform greyish-brown color. This swirling creates the beautiful marbled effect that makes brookie bars so visually appealing and adds to the textural excitement.
Baking and Cooling: The Final Frontier
Bake the brookie bars in your preheated oven for 25-35 minutes, or until the edges are set and a toothpick inserted into the center comes out with moist crumbs attached, but not wet batter. Be careful not to overbake, as this can result in dry bars. Once baked, remove the pan from the oven and let the brookie bars cool completely in the pan on a wire rack. This is a crucial step; they will continue to set as they cool, and cutting them while warm will likely lead to a messy disaster. Once fully cooled, use the parchment paper overhang to lift the entire slab out of the pan. Cut into squares and prepare for pure bliss! These bars are best enjoyed at room temperature, but a quick 10-second zap in the microwave can bring back some of that gooey warmth. Enjoy every delicious bite!
Conclusion:
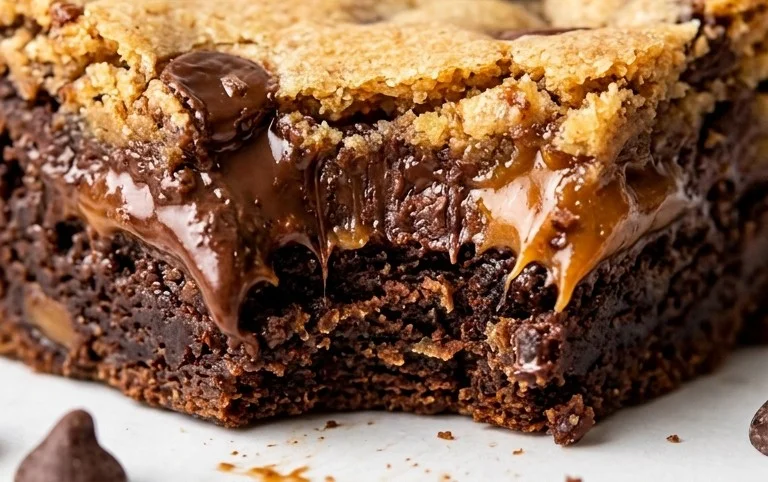
So there you have it! This Brookie recipe truly delivers the best of both worlds, combining the chewy, sweet goodness of a chocolate chip cookie with the rich, fudgy depth of a brownie into one glorious bar. It’s the ultimate crowd-pleaser, perfect for potlucks, parties, or just when you’re craving something truly decadent. The beauty of this brookie is its adaptability. Feeling adventurous? Try swirling in some caramel, adding a layer of cheesecake batter, or incorporating some chopped nuts for extra texture. The possibilities are endless! I really encourage you to give this recipe a try. It’s surprisingly straightforward, and the payoff in terms of deliciousness is immense. Get ready to impress yourself and everyone lucky enough to share these amazing treats with you!
Frequently Asked Questions about Brookies:
Q: How should I store leftover brookie bars?
A: Store your brookie bars in an airtight container at room temperature for up to 3 days. For longer storage, you can refrigerate them, which will make them slightly firmer but still delicious. They also freeze beautifully, so you can make a big batch and enjoy them for weeks to come!
Q: Can I make brookie bars ahead of time?
A: Absolutely! Brookies are an excellent make-ahead treat. You can bake them a day or two in advance and store them at room temperature. In fact, they often taste even better the next day as the flavors have had a chance to meld together.
Q: What makes this brookie recipe so special?
A: This recipe is special because it perfectly balances the textures and flavors of a classic chocolate chip cookie and a fudgy brownie. You get that satisfying chew from the cookie dough and the intense chocolate experience from the brownie layer, all in one easy-to-make bar. It’s a guaranteed hit!
Brookie (Chocolate Chip Cookie and Brownie Bar)
A delicious bar combining the best of chocolate chip cookies and rich brownies. Layers of chewy cookie dough baked over a fudgy brownie base.
Ingredients
-
3/4 cup Butter ((softened))
-
1 cup Sugar
-
1/3 cup Brown Sugar
-
2 large Eggs
-
1 teaspoon Vanilla
-
1/2 cup Unsweetened Cocoa Powder
-
1 cup Flour
-
1/2 teaspoon Baking Soda
-
1/4 teaspoon Salt
-
1/2 cup Chocolate Chips ((optional))
-
1/2 cup Butter ((softened))
-
3/4 cup Brown Sugar
-
1/4 cup Sugar
-
1 large Egg
-
1 teaspoon Vanilla
Instructions
-
Step 1
Preheat oven to 350°F (175°C). Grease and flour a 9×13 inch baking pan. -
Step 2
For the brownie layer: In a medium bowl, melt 1/2 cup butter. Stir in 3/4 cup brown sugar and 1/4 cup sugar until well combined. Beat in 1 large egg and 1 teaspoon vanilla. -
Step 3
In a separate bowl, whisk together 1/2 cup unsweetened cocoa powder, 1/2 cup flour, 1/4 teaspoon baking soda, and 1/4 teaspoon salt. Gradually add the dry ingredients to the wet ingredients, mixing until just combined. Spread this brownie batter evenly into the prepared baking pan. -
Step 4
For the cookie layer: In a large bowl, cream together 3/4 cup softened butter, 1 cup sugar, and 1/3 cup brown sugar until light and fluffy. Beat in 2 large eggs one at a time, then stir in 1 teaspoon vanilla. -
Step 5
In a separate bowl, whisk together 1 cup flour, 1/2 teaspoon baking soda, and 1/4 teaspoon salt. Gradually add the dry ingredients to the wet ingredients, mixing until just combined. If using, stir in 1/2 cup chocolate chips. -
Step 6
Dollop spoonfuls of the cookie dough over the brownie batter in the pan. Gently spread the cookie dough to cover the brownie layer as much as possible. -
Step 7
Bake for 30-35 minutes, or until a toothpick inserted into the center comes out with moist crumbs attached. Let cool completely in the pan before cutting into bars.
Important Information
Nutrition Facts (Per Serving)
It is important to consider this information as approximate and not to use it as definitive health advice.
Allergy Information
Please check ingredients for potential allergens and consult a health professional if in doubt.